介绍
身份认证在每一个服务端应用都是绕不过的问题,只有通过了身份认证的处理我们才能更好的去分配资源给用户。
在nestjs中,通过内置封装了Passport库来使得我们进行身份认证更为容易简单了。现在,我们就尝试来使用nestjs内置的功能来实现身份认证功能吧。
开始
我们这里先打开终端,通过下面命令新建一个空的项目:
1
| nest new authentication-demo
|
项目创建完成后,打开项目。上面说过nestjs对Passport进行了一个封装,所以我们在编码前需要安装如下库:
1
2
| npm install --save @nestjs/passport passport passport-local
npm install --save-dev @types/passport-local
|
依赖库完毕之后,我们还需要创建两个模块,在终端中输入以下命令:
1
2
3
4
| nest g mo auth
nest g s auth --no-spec
nest g mo user
nest g s user --no-spec
|
当以上命令执行完毕之后,我们应该会有如下目录结构:

如果上述步骤都没有问题,接下来我们将开始实现身份认证的步骤了。
身份认证
数据模拟
首先,在进行认证的编码工作前,我们需要进行一个数据的简单模拟,打开user.service.ts文件,进行如下编码:
1
2
3
4
5
6
7
8
9
10
11
12
13
14
15
16
17
18
19
20
| import { Injectable } from '@nestjs/common';
export type User = {
id: number;
username: string;
password: string;
};
@Injectable()
export class UserService {
private users: User[] = [
{ id: 1, username: 'zhangsan', password: 'zs123' },
{ id: 2, username: 'lisi', password: 'ls123' },
{ id: 3, username: 'wangwu', password: 'ww123' },
];
async findOneByUsername(username: string): Promise<User | undefined> {
return this.users.find((item) => item.username === username);
}
}
|
好了,现在我们已经模拟出了一个“用户表”,里面分别有“张三,李四,王五”的数据信息。
用户验证方法
现在,我们打开auth.service.ts文件,编写一个验证用户信息的方法,代码如下:
1
2
3
4
5
6
7
8
9
10
11
12
13
14
15
16
| import { Injectable } from '@nestjs/common';
import { UserService } from '../user/user.service';
@Injectable()
export class AuthService {
constructor(private usersService: UserService) {}
async validateUser(username: string, passord: string): Promise<any> {
const user = await this.usersService.findOneByUsername(username);
if (user && user.password === passord) {
const { password, ...result } = user;
return result;
}
return null;
}
}
|
该方法主要作用:调用UserService判断用户名和密码是否与模拟的数据一致。
验证策略
完成以上步骤后,接下来我们就需要开始编写用户验证对应的策略。在auth目录下面,我们新建一个local.strategy.ts文件,并编写如下代码:
1
2
3
4
5
6
7
8
9
10
11
12
13
14
15
16
17
18
19
| import { Strategy } from 'passport-local';
import { PassportStrategy } from '@nestjs/passport';
import { Injectable, UnauthorizedException } from '@nestjs/common';
import { AuthService } from './auth.service';
@Injectable()
export class LocalStrategy extends PassportStrategy(Strategy) {
constructor(private authService: AuthService) {
super();
}
async validate(username: string, password: string): Promise<any> {
const user = await this.authService.validateUser(username, password);
if (!user) {
throw new UnauthorizedException();
}
return user;
}
}
|
在上面的代码中,我们通过调用AuthService里面的validateUser方法,以此来判断用户名和密码是否正确,当验证失败时会直接抛出UnauthorizedException异常。
因为我们使用了依赖注入来引入其他服务类,所以我们的auth.module.ts文件也需要进行对应模块的引入:
1
2
3
4
5
6
7
8
9
10
11
| import { Module } from '@nestjs/common';
import { PassportModule } from '@nestjs/passport';
import { UserModule } from 'src/user/user.module';
import { AuthService } from './auth.service';
import { LocalStrategy } from './local.strategy';
@Module({
imports: [UserModule, PassportModule],
providers: [AuthService, LocalStrategy],
})
export class AuthModule {}
|
守卫验证
完成以上所有步骤后,我们就可以进入控制器里面对希望的路由添加内置的装饰器进行一个拦截,例如下面代码:
1
2
3
4
5
6
7
8
9
10
11
12
13
14
15
| import { Controller, Post, UseGuards } from '@nestjs/common';
import { Req } from '@nestjs/common/decorators';
import { AuthGuard } from '@nestjs/passport';
import { AppService } from './app.service';
@Controller()
export class AppController {
constructor(private readonly appService: AppService) {}
@UseGuards(AuthGuard('local'))
@Post('auth/login')
async login(@Req() req) {
return req.user;
}
}
|
上面的@UseGuards(AuthGuard('local'))就通过使用nestjs内置的AuthGuard守卫来进行身份验证的,其原理就是通过传入的local找到对应的策略并调用validate方法来获得验证结果。
上面我们创建的策略LocalStrategy默认名称为:local
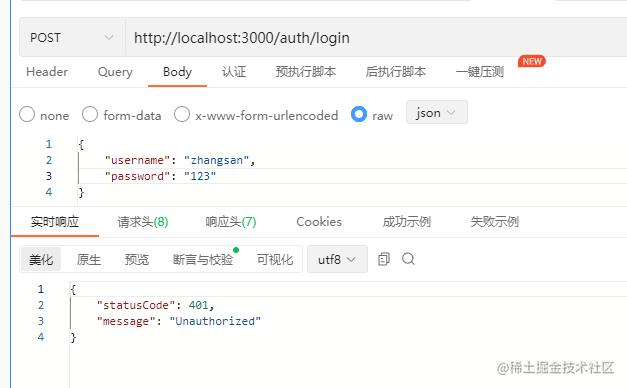
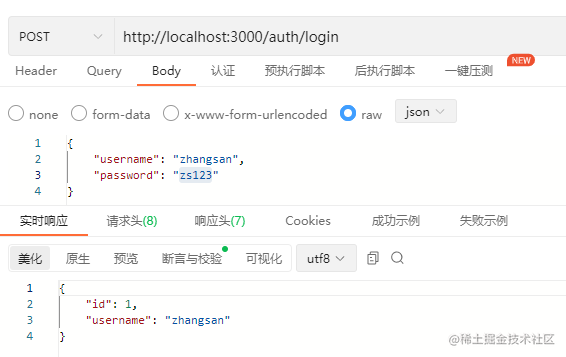
好的,一切完成之后我们请求一下该接口,看看会是什么结果。
- 我们先输入错误用户身份的情况,如图所示:
- 改正信息,输入正确的密码,发现返回了正确结果:
到这里,我们验证身份的目的已经基本实现了。
但是还有一个问题,我们通常进行身份验证时除了登录会用到用户和密码以外,其他情况都是通过token这种令牌来验证的,所以我们还需要进行扩展。
JWT验证
要在nestjs中使用jwt进行验证,还需要安装几个依赖库,输入以下命令:
1
2
| npm install --save @nestjs/jwt passport-jwt
npm install --save-dev @types/passport-jwt
|
安装完成以后,我们打开auth.service.ts文件,并添加如下方法:
1
2
3
4
5
6
7
8
9
10
11
12
13
14
15
16
17
18
19
20
21
22
23
24
25
26
27
| import { Injectable } from '@nestjs/common';
import { JwtService } from '@nestjs/jwt';
import { UserService } from '../user/user.service';
@Injectable()
export class AuthService {
constructor(
private usersService: UserService,
private jwtService: JwtService,
) {}
async validateUser(username: string, passord: string): Promise<any> {
const user = await this.usersService.findOneByUsername(username);
if (user && user.password === passord) {
const { password, ...result } = user;
return result;
}
return null;
}
async login(user: any) {
const payload = { username: user.username, sub: user.id ;
return {
access_token: this.jwtService.sign(payload),
};
}
}
|
编写完成以后,我们在auth目录下再次创建一个名为constants.ts的文件,并编写如下代码:
1
2
3
4
| export const jwtConstants = {
secret:
'DO NOT USE THIS VALUE. INSTEAD, CREATE A COMPLEX SECRET AND KEEP IT SAFE OUTSIDE OF THE SOURCE CODE.',
};
|
该文件中导出的secret是我们下面创建token需要的一个私密key值。
好,现在进入auth.module文件中,引入jwt模块,并对代码进行如下编写:
1
2
3
4
5
6
7
8
9
10
11
12
13
14
15
16
17
18
19
20
| import { Module } from '@nestjs/common';
import { JwtModule } from '@nestjs/jwt';
import { PassportModule } from '@nestjs/passport';
import { UserModule } from 'src/user/user.module';
import { AuthService } from './auth.service';
import { jwtConstants } from './constants';
import { LocalStrategy } from './local.strategy';
@Module({
imports: [
UserModule,
PassportModule,
JwtModule.register({
secret: jwtConstants.secret,
signOptions: { expiresIn: '60s' },
}),
],
providers: [AuthService, LocalStrategy],
})
export class AuthModule {}
|
完成上述步骤后,我们接下来就得像之前一样为token验证创建一个策略,在auth目录下新建jwt.strategy.ts文件,并编写如下代码:
1
2
3
4
5
6
7
8
9
10
11
12
13
14
15
16
17
18
19
| import { ExtractJwt, Strategy } from 'passport-jwt';
import { PassportStrategy } from '@nestjs/passport';
import { Injectable } from '@nestjs/common';
import { jwtConstants } from './constants';
@Injectable()
export class JwtStrategy extends PassportStrategy(Strategy) {
constructor() {
super({
jwtFromRequest: ExtractJwt.fromAuthHeaderAsBearerToken(),
ignoreExpiration: false,
secretOrKey: jwtConstants.secret,
});
}
async validate(payload: any) {
return { userId: payload.sub, username: payload.username };
}
}
|
完成以上策略后,我们还需要进入auth.module.ts中注册依赖:
1
2
3
4
5
6
7
8
9
10
11
12
13
14
15
16
17
18
19
20
21
| import { Module } from '@nestjs/common';
import { JwtModule } from '@nestjs/jwt';
import { PassportModule } from '@nestjs/passport';
import { UserModule } from 'src/user/user.module';
import { AuthService } from './auth.service';
import { jwtConstants } from './constants';
import { JwtStrategy } from './jwt.strategy';
import { LocalStrategy } from './local.strategy';
@Module({
imports: [
UserModule,
PassportModule,
JwtModule.register({
secret: jwtConstants.secret,
signOptions: { expiresIn: '60s' },
}),
],
providers: [AuthService, LocalStrategy, JwtStrategy],
})
export class AuthModule {}
|
完成以上步骤后,我们就可以进入控制器中添加一个需要jwt认证的路由:
1
2
3
4
5
| @UseGuards(AuthGuard('jwt'))
@Get('profile')
getProfile(@Req() req) {
return req.user;
}
|
完成路由的添加后,我们尝试请求该接口,返回如下:
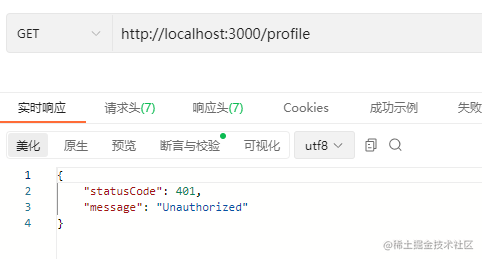
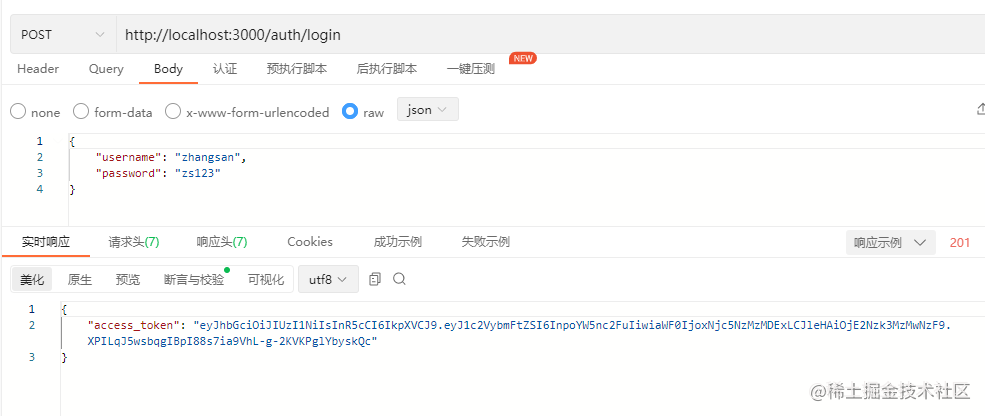
这是因为,我们请求接口时还未携带token参数,现在我们修改之前的登录接口,返回生成的token值:
1
2
3
4
5
| @UseGuards(AuthGuard('local'))
@Post('auth/login')
async login(@Req() req) {
return this.authService.login(req.user);
}
|
请求完成之后,可以发现我们已经成功获取到token值了,截图如下:
很好,现在我们在拿着刚刚获取的token值再次请求profile接口,结果如图:
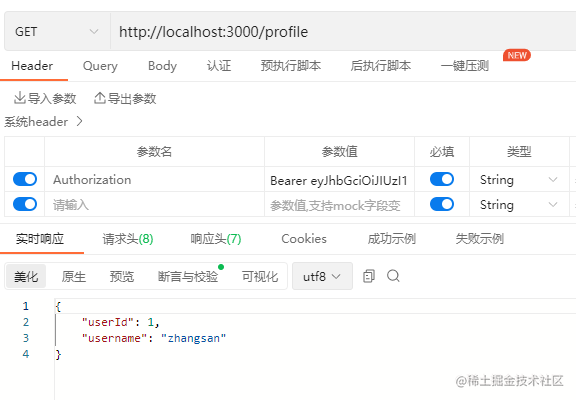
发现请求成功,并且在req对象中还为我们将token的信息解析出来并挂载成一个user对象。
其他用法
上面大概介绍了身份认证的一个过程,下面对身份认证的一些方法进行一个补充说明。
继承守卫
可以看到上面我们使用@AuthGuard('jwt')的方式进行守卫装饰器的使用,但是推荐使用继承的方式来使用,例如:
1
| export class JwtAuthGuard extends AuthGuard('jwt')
|
上面通过JwtAuthGuard继承@AuthGuard('jwt')后,传入jwt的硬编码方式需要修改时也只会更改一次了,并且通过继承的方式我们还能对拦截方法进行一个扩展。
全局守卫
当我们需要验证的路由处于绝大部分时,我们可以通过使用依赖注入方式全局注册守卫。然后,通过对某些开放路由设置元数据,进行一个判断。例如:
1
2
3
4
5
6
| providers: [
{
provide: APP_GUARD,
useClass: JwtAuthGuard,
},
]
|
然后通过继承AuthGuard守卫来重写拦截逻辑,例如:
1
2
3
4
5
6
7
8
9
10
11
12
13
14
15
16
17
| @Injectable()
export class JwtAuthGuard extends AuthGuard('jwt') {
constructor(private reflector: Reflector) {
super();
}
canActivate(context: ExecutionContext) {
const isPublic = this.reflector.getAllAndOverride<boolean>(IS_PUBLIC_KEY, [
context.getHandler(),
context.getClass(),
]);
if (isPublic) {
return true;
}
return super.canActivate(context);
}
}
|
自定义策略参数
上面写的LocalStrategy策略,默认的规则是:必须接收username和password两个参数,可以视作为:
1
2
3
4
5
6
| constructor(private authService: AuthService) {
super({
usernameField: 'username
passwordField: 'password',
});
}
|
此时,我们通过super方法重新修改参数,即可达到修改策略的一个目的。
指定策略名称
默认的,我们继承的策略都会有一个自动生成的名称,但是我们可以通过以案来自己定义:
1
| export class JwtStrategy extends PassportStrategy(Strategy, 'myjwt')
|

评论区
欢迎你留下宝贵的意见,昵称输入QQ号会显示QQ头像哦~